3W Gooseneck LED Nail Lamp for Spot Curing Gel Nails
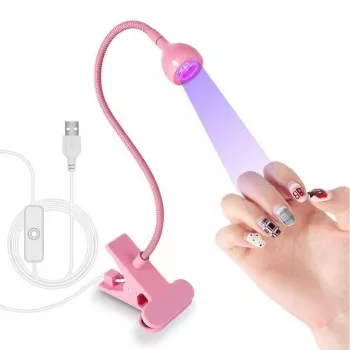
3W LED Nail Lamp With Flexible Gooseneck for Gel Nails
A small, targeted nail lamp can make gel curing easier when space is limited or when a full-size lamp feels like overkill. This 3W LED nail lamp uses a flexible gooseneck to help aim light where it’s needed for gel nails, spot curing, touch-ups, and quick fixes—without rearranging the whole setup. For more guidance, see [PDF] Chapter 2 – Laboratory Techniques.
What This Lamp Is Designed to Do
A 3W gooseneck nail lamp is built for precision rather than “cure the whole hand at once” speed. It’s especially handy when you want control over where the light lands and how long it stays there. For further reading, see Sanpyl Gel Polish Dryer, Professional Quick Drying Nail Curing ….
- Provide focused light for curing gel nail products on a single nail or small area at a time
- Help with precision tasks like securing nail tips, curing small repairs, and setting gel art details
- Offer adjustable positioning via a flexible gooseneck so the light can be aimed without moving the hand awkwardly
- Fit into compact home setups such as a desk, vanity, or small manicure station
Key Features That Matter During a Manicure
When a lamp is meant for localized curing, the details that matter most are aim, consistency, and convenience. A flexible neck and a small footprint can reduce the “shuffle” that sometimes leads to smudges, flooded cuticles, or missed sidewalls.
- 3W LED power for targeted, localized curing tasks rather than full-hand curing in one cycle
- Flexible gooseneck for angle control, helping reduce missed spots on edges and sidewalls
- Simple, minimal footprint that’s easier to store than larger dome-style lamps
- Useful for both beginners (learning to control gel placement) and experienced users (detail work and repairs)
| Need | Why it helps | Typical scenario |
|---|---|---|
| Spot curing | Targets a single nail/area without flooding the whole hand | Locking in rhinestones, gel art details, small chips |
| Limited space | Small setup footprint | Dorm room desk, shared vanity, small apartment |
| Angle control | Gooseneck aims light where gels tend to lift | Cuticle line and sidewalls |
| Travel or backup | Easy to pack as a secondary lamp | On-the-go touch-ups or a spare for quick fixes |
How to Use It for Better Results
Because this style of lamp is designed for one-nail focus, technique matters. Better prep and smarter positioning typically make a bigger difference than simply “curing longer.”
- Prep nails well: remove oils, push back cuticles, and ensure the nail surface is clean and dry before gel application
- Apply thin, even gel layers to reduce wrinkling or under-curing—thicker layers generally need more time or a different curing approach
- Position the gooseneck so the light hits the entire coated area, including the sidewalls and free edge
- Cure one nail at a time for precision (especially helpful for builder gel placements or art that can shift)
- After curing, follow the gel system instructions for wiping inhibition layer (if applicable) and top coat finishing
Where a Gooseneck Lamp Helps Most
A small lamp shines in the “in-between” moments of a manicure—when you need gel to stop moving, stop slipping, or stop lifting before you continue with the next step.
- Gel nail art: quick-setting details so lines and embellishments don’t spread
- Tip application: holding a tip in place while the gel sets (use steady pressure and correct alignment)
- Repairs: curing small cracks, lifting corners, or patching a chipped area without redoing all nails
- Detail top-coat work: locking in small areas before a full cure in another lamp (if used as part of a two-lamp routine)
Curing and Skin-Safety Habits
UV/LED curing is common in gel routines, but it’s still smart to keep exposure intentional and brief—focused on the nail plate, not surrounding skin. For additional background on safe habits, see the American Academy of Dermatology Association guidance on gel manicures and the U.S. FDA information on UV radiation.
- Avoid shining light directly on skin for longer than necessary; aim the lamp at the nail surface
- Use fingerless UV-protective gloves or apply broad-spectrum sunscreen to hands (avoiding the nail plate) if frequent exposure is a concern
- Stop and reassess if gel feels excessively hot; heat spikes can happen with some gels, especially if applied too thick
- Keep gels off skin before curing to reduce irritation risk; clean edges before curing whenever possible
Troubleshooting Common Issues
Spot-curing tools are precise, but they can also reveal small technique issues—like shadows near sidewalls or too-thick product near the cuticle line.
Who It’s Best For
Product Options
- 3W LED Nail Lamp Flexible Gooseneck Manicure Dryer for Gel Nails ($7.97): a compact, adjustable curing light for targeted gel work and precision positioning.
- The Ultimate Productivity Blueprint | Digital Productivity Guide for Goal Setting, Time Management & Daily Routines ($14.99): helpful for organizing self-care routines, appointment schedules, and at-home manicure time blocks.
FAQ
Is a 3W LED nail lamp enough for gel nails?
It’s typically best for targeted spot curing, single-nail work, and setting details rather than curing a full hand quickly. Results depend on the gel formula and layer thickness, so follow the gel brand’s curing directions and extend cure time when needed.
How close should the lamp be to the nail?
Position it close enough to fully cover the coated area without touching the nail, and use the gooseneck to eliminate shadows along sidewalls and the free edge. Keep exposure time aligned with the gel system’s instructions.
Can a small gooseneck lamp replace a full-size nail lamp?
It can work well for single-nail curing and touch-ups, but a full-size lamp is usually faster for complete sets. Many routines use a small gooseneck lamp as a precision tool or backup alongside a larger unit.


Leave a comment