Square Nail Sponge & Grab Pen Kit for Ombré Fades
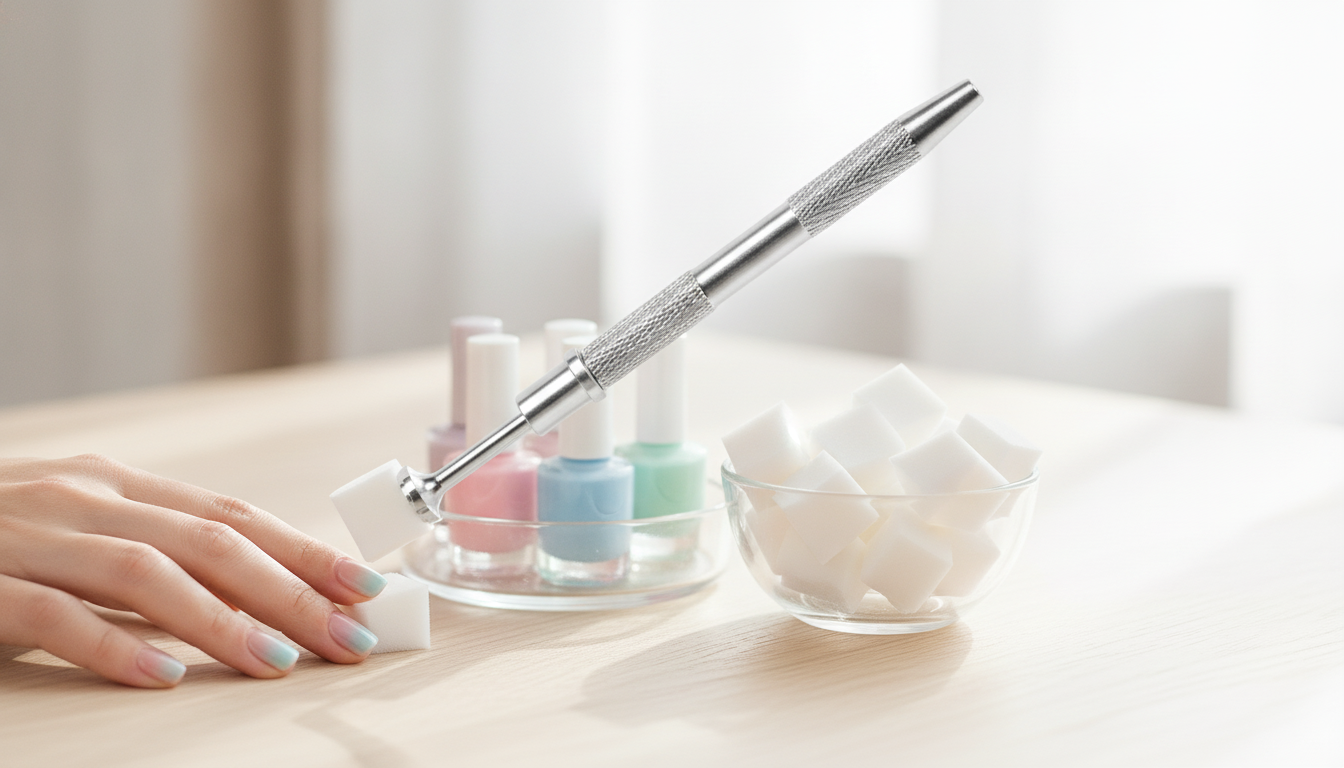
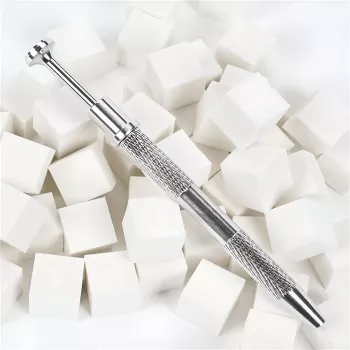
50Pcs Square Nail Art Sponges & Grab Pen Set for Smooth Ombré Nails
A clean gradient can look salon-level when the tools make blending easy. This set pairs square sponges (for controlled color pickup and even transfer) with a grab pen (for cleaner handling and less product waste) so ombré, baby boomer, and soft fade designs are simpler to repeat on every nail.
What’s Included and What Each Piece Does
- Square nail art sponges: Designed to dab and blend polish in layers for a gradual fade. The flat face helps distribute color evenly without random blotches.
- Grab pen: Helps hold and place the sponge precisely, keeping fingers away from wet polish and reducing smudges. It also makes it easier to “stamp” exactly where you want the fade to start.
- High-quantity set: Supports multiple looks, practice sessions, and quick sponge changes between colors—especially useful when you’re working with contrasting shades.
If you’re ready to restock your gradient essentials, the 50Pcs Square Nail Art Sponges & Grab Pen Set for Gradient Nail Design keeps the workflow simple: load, dab, swap, repeat.
Why Square Sponges Help With Gradients
Round cosmetic wedges can work, but a square sponge is built for nail-sized precision. You get more control over the direction of your fade and more usable “clean edges” to switch to when colors start mixing.
- Flat edges make it easier to align the fade direction (horizontal, vertical, diagonal) without twisting the sponge.
- A squared surface can help keep the color band straight across the nail, especially for French-ombré styles.
- Fresh sponge sections between dabs help avoid muddy color mixing and keep the transition crisp.
Square Sponge Benefits by Design Goal
| Design goal | How the square sponge helps | Quick tip |
|---|---|---|
| Soft ombré | Even coverage across the nail plate | Build color in thin layers; let each layer get tacky before the next. |
| Bold two-tone fade | Cleaner transition line placement | Apply lighter shade first, then deepen the edge with the darker shade. |
| Baby boomer (pink to white) | More control near the tip and sidewalls | Use minimal polish on the sponge and dab lightly near the cuticle. |
| Multi-color sunset blend | More consistent banding across nails | Use separate sponge faces per color set to keep tones bright. |
How to Create a Gradient Step by Step
A smooth ombré is less about one heavy stamp and more about quick, light layering. The goal is to build opacity without flooding the cuticle line or over-mixing the shades.
- Prep: Clean nails, push back cuticles, lightly buff if needed, then apply base coat and let it dry.
- Base color: Paint the lightest shade on the nail as a base layer to help the fade look smoother and brighter.
- Load the sponge: Apply two (or more) polish stripes directly onto the sponge, slightly overlapping where the transition should be. If you’re using three colors, overlap each boundary lightly.
- Dab in layers: Tap the sponge onto the nail with light pressure; repeat to build opacity without flooding the edges. Keep your hand steady and let the sponge do the work.
- Refine: Use a small brush dipped in remover to tidy the cuticle line and sidewalls. Cleaning between layers (instead of only at the end) prevents a thick ridge from forming at the edges.
- Seal: Apply a glossy top coat to melt the layers visually and reduce the speckled sponge texture. “Floating” the top coat over the surface helps avoid dragging pigment.
For nail health basics—especially if you’re frequently polishing or removing product—refer to the American Academy of Dermatology’s nail care basics and the FDA overview of nail care products.
Using the Grab Pen for Cleaner Results
The grab pen is the small upgrade that makes gradients feel less messy. It lets you work closer to the cuticle and sidewalls without accidentally touching wet polish.
- Steadier placement: Hold the sponge steady for more precise placement, especially near the cuticle and free edge.
- No fingerprints: Rotate and reposition without touching wet polish, reducing smears and accidental dents.
- Faster color changes: Swap sponges quickly to keep transitions crisp—particularly helpful for multi-color designs.
Tip: When the sponge face starts to look glossy or saturated, switch to a fresh piece. You’ll get a cleaner fade with fewer dabs.
Best Looks to Try With This Set
Care, Hygiene, and Storage
Common Gradient Problems and Quick Fixes
More In-Stock Picks
- 50Pcs Square Nail Art Sponges & Grab Pen Set for Gradient Nail Design
- The Ultimate Productivity Blueprint | Digital Productivity Guide for Goal Setting, Time Management & Daily Routines
- Stronger Together: Family Bonding Pack | Digital Family Activities Guide for Kids & Parents
FAQ
How many dabs does it take to get a smooth ombré?
Plan on about 2–5 light passes per nail, depending on polish opacity and how bold you want the fade. Lighter layers blend better than one heavy, wet stamp, and a glossy top coat typically makes the gradient look smoother right away.
Can these sponges be used with gel polish?
Yes, many gel formulas can be dabbed for an ombré, but thickness matters—thin layers work best. Use a small amount on the sponge, dab lightly, and cure between layers so the blend doesn’t slide or bulk up.
How do you keep the gradient from looking grainy?
Use minimal polish on the sponge and build thin layers, letting each layer get slightly tacky before adding the next. Finish with a smoothing top coat, floating it over the surface to reduce visible sponge texture.


Leave a comment