U-Shaped Nose Contour Brush: Symmetry in Fewer Steps
Nose Contour U-Shaped Makeup Brush: Faster Symmetry, Softer Definition
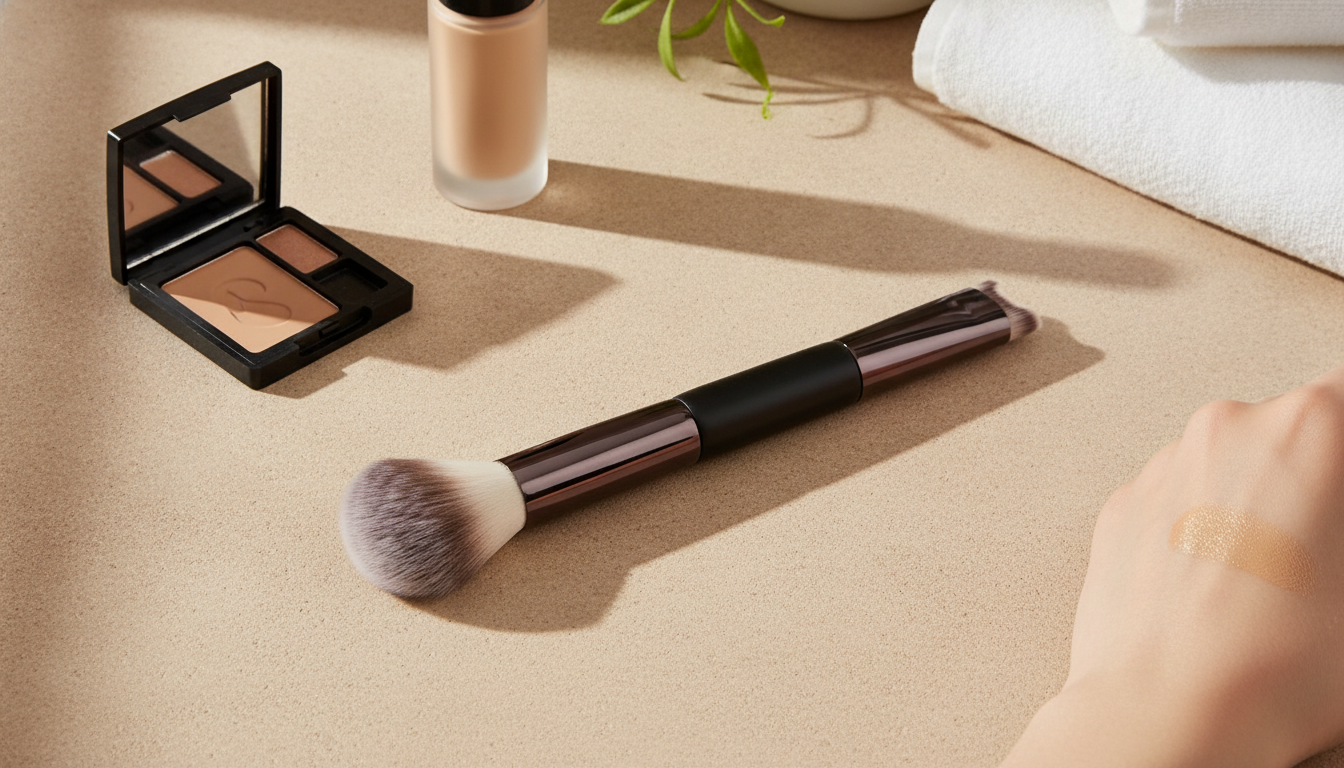
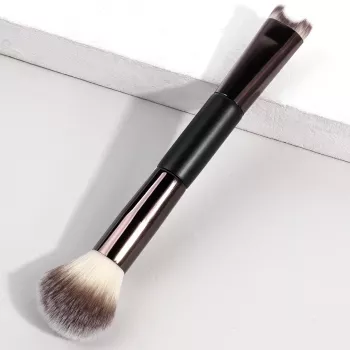
A U-shaped nose contour brush is designed to place and blend shading along both sides of the nose in a more symmetrical way, helping create a softer, more even contour with fewer steps. The curved head “hugs” the bridge area so you can build a narrow-looking effect with light, controlled layers. Below is a practical guide to what the shape does well, how to use it with powder or cream, placement tips for different nose shapes, and how to keep the brush clean for consistent results.
What a U-Shaped Nose Brush Does Differently
Traditional small contour brushes often require you to flip angles and re-check both sides repeatedly. A U-shaped head simplifies that motion by aligning to the bridge area.
- One motion, two sides: The U-shaped head can lay product along both sides of the bridge more evenly, instead of re-creating the same line twice with separate strokes.
- More consistent pressure: The curved profile helps keep pressure balanced from left to right, which can reduce uneven lines and “one side darker” issues.
- Best for a slim-bridge illusion: Used with light, buildable layers, it’s especially effective for subtle daily definition that still looks like skin.
- Useful for softening edges: If the bristles are dense but flexible, the shape can help blur harsh contour borders without pushing color outward.
Quick Overview and Best Uses
This brush shape shines when control and symmetry matter more than heavy sculpting. It’s also a good option for beginners who want guardrails against overly wide shading.
- Best for: subtle everyday contour, quick symmetry checks, and precise placement close to the bridge without spreading pigment too far.
- Pairs well with: cool-neutral contour shades (for believable shadow), plus a small highlight brush or fingertip for the center of the bridge.
- Most natural finish: natural-matte contours tend to look the most realistic; overly warm bronzer can read orange on the nose in daylight.
- Make it foolproof: tap off excess powder, or wipe a tiny amount of cream on the back of your hand before applying.
When to use a U-shaped nose brush
| Goal | Product type | Why the U-shape helps | Tip for a natural result |
|---|---|---|---|
| Make the bridge look slimmer | Powder contour | Places shadow evenly on both sides | Use light pressure and build in 2–3 layers |
| Soften a strong contour | Powder or cream | Curved head blends inward without widening | Blend upward toward the brow, not outward onto cheeks |
| Shorten the nose visually | Powder contour + highlight | Easy to add shadow under the tip and blend | Keep highlight short (mid-bridge only) |
| Fix uneven lines | Powder contour | Mirrors placement with fewer angle changes | Check symmetry straight-on in natural light |
How to Use It (Powder and Cream)
For the most realistic result, treat nose contour like a shadow adjustment rather than a stripe. The brush makes placement easier, but a light hand still matters.
Step 1: Prep the base
- Apply foundation and concealer first.
- If using powder contour, set lightly so the contour glides without grabbing.
- If using cream contour, keep the base slightly tacky so it blends seamlessly (but not wet).
Step 2: Powder method
- Dip lightly into product and tap off excess.
- Position the U-shape so it frames the bridge area, then press/drag gently to place shadow on both sides.
- Use short strokes to blend upward toward the brow and slightly inward, keeping the shading tight.
Step 3: Cream method
- Pick up a tiny amount, then wipe most of it off on the back of your hand.
- Stamp gently along the sides of the bridge where you want the shadow.
- Buff with minimal pressure, adding more only where needed (usually near the upper bridge/inner eye area).
Step 4: Keep the center clean + optional highlight
- Avoid dragging contour across the center of the bridge. Leaving a slim unshaded strip helps the nose look lifted and refined.
- For highlight, use a thin line on the mid-bridge only. Skipping a bright tip highlight often looks more natural in strong daylight.
Placement Tips for Common Nose Shapes
Small adjustments make a big difference on the nose because the area is compact and catches light directly. The goal is to create a believable shadow, not a harsh outline.
Choosing Shade and Finish for Realistic Shadow
Care, Cleaning, and Skin-Safety Basics
For detailed, dermatologist-backed guidance, see the American Academy of Dermatology Association tips on cleaning makeup brushes and sponges. If breakouts are a concern, general prevention habits are also summarized by the Mayo Clinic.
Product Options to Try
- Nose Contour U-Shaped Makeup Brush — a compact option designed to support more consistent, symmetrical nose contour placement.
- The Ultimate Productivity Blueprint — a digital guide that can help structure a faster, repeatable get-ready routine (helpful if you like step-by-step checklists).
- Stronger Together: Family Bonding Pack — printable activities and checklists that make an easy add-on if you’re shopping for a mixed cart or gifting.
FAQ
Can a U-shaped nose contour brush be used with both powder and cream products?
Yes. Use a lighter touch for creams, wipe off excess before applying, and blend in short strokes; for powders, tap off and build gradually to avoid harsh lines.
How do you keep nose contour from looking harsh or muddy?
Stick to cool-neutral shades, use less product than you think, and blend upward/inward rather than outward onto the cheeks. A quick symmetry check in natural light helps catch muddiness early.
How often should a nose contour brush be washed?
If you use it often, aim for weekly washing, with a quick wipe between uses to reduce buildup. Always let it dry completely so the bristles keep their shape and apply evenly.


Leave a comment