Liner Nail Art Brushes: Perfect Striping in Any Length

Liner Nail Art Brushes for Clean Striping, Elongated Lines, and Fine Detail Work
A good liner brush makes the difference between shaky stripes and smooth, continuous lines. Elongated liner brushes are designed to carry a tiny, controlled “bead” of product so it releases steadily as you pull a stroke—helping striping, swirls, and micro-details look crisp on natural nails, gel overlays, or traditional polish. Below is a practical guide to what each bristle length does, how to get cleaner lines with fewer touch-ups, and how to keep a sharp point over time.
What a liner nail brush is best at
Liner brushes use long, thin bristles to hold a small amount of product and lay it down in a consistent stream. Compared with short detail brushes, they’re better at maintaining an even line width from start to finish.
- Uninterrupted striping: parallel lines, pinstripes, and clean borders that don’t look “stitched” together.
- Elongated curves: S-curves, ribbons, and flowing swirl accents that need a single confident pull.
- Outline work: French outlines, side-French borders, and negative-space frames.
- Delicate stems and tendrils: thin vines, leaf stems, and fine floral connectors.
- Versatile mediums: works with regular nail polish, gel paint/gel polish, and some acrylic paint (depending on thickness and how fast it dries).
Choosing the right bristle length: 6/9/12/15/18/25 mm
Length controls how the brush behaves. Shorter bristles feel “snappier” and easier to steer; longer bristles glide farther with fewer reloads but demand lighter pressure and better stability. Matching length to the design usually means fewer cleanup passes and more symmetrical results.
| Length (mm) | Best for | Skill feel | Common mistakes to avoid |
|---|---|---|---|
| 6 | Micro details, tiny stripes, outlining near cuticles | Most controlled | Overloading product (flooding edges) |
| 9 | Short stripes, small waves, simple geometric accents | Controlled | Pressing too hard (lines get thick) |
| 12 | Everyday striping, side borders, gentle curves | Balanced | Stopping mid-stroke (visible joins) |
| 15 | Longer stripes, French outline, S-curves | Flow-focused | Too much pressure (bristles splay) |
| 18 | Extended lines across full nail, layered striping | Requires lighter touch | Dragging a drying product (skips) |
| 25 | Ultra-long continuous lines, ribbon effects, large arcs | Most advanced | Not enough product on brush (broken line) |
How to get clean elongated lines (step-by-step)
- Prep the surface: Apply your base color and fully cure/dry it so the liner doesn’t “grab” and drag.
- Load the brush lightly: Roll the bristles through product, then wipe one side against the palette/bottle neck to form a fine point. The goal is a thin, wet tip—not a droplet.
- Anchor your hand: Rest your pinky or the side of your hand on the table. Small stability gains make lines look dramatically cleaner.
- Glide with your whole hand: Move the arm/hand together instead of “drawing” only with bent fingers. This helps curves stay smooth.
- Keep pressure minimal: Let the bristle length carry product. If you push down, bristles fan out and the stripe widens unevenly.
- Exit confidently: Finish the stroke without lifting early. A clean exit creates a tapered end instead of a blunt stop mark.
- Seal carefully: Use a top coat and cure/dry. When linework sits slightly raised, “float” the top coat—avoid scrubbing the brush over the lines.
Design ideas that suit liner brushes
- Classic striping: Place 2–5 parallel lines along one sidewall for a salon-clean accent.
- Negative-space geometry: Thin frames, off-center rectangles, triangles, and asymmetrical borders.
- French variations: Double French, outline French, and side French (9–15 mm tends to feel easiest).
- Swirls and “ribbon” effects: Layer elongated S-curves in contrasting tones for depth.
- Minimal florals: Use 6–12 mm for tiny leaves and buds, then a 15 mm for longer stems and connectors.
- Aura or tortoise outlines: Thin contouring that defines blended transitions without harsh blocks of color.
What to use with liner brushes (polish, gel, and paint)
For general nail product safety and best practices, reference guidance from the U.S. Food & Drug Administration (FDA) and nail health basics from the American Academy of Dermatology Association.
Cleaning, reshaping, and storage
Common problems and quick fixes
Product options to build your liner toolkit
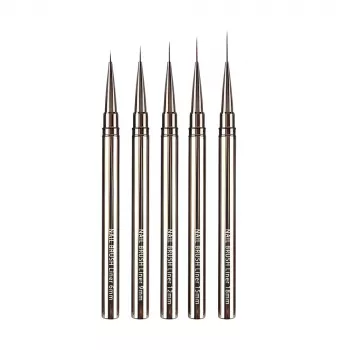
- Nails Art Liner Brushes (6/9/12/15/18/25mm) nail design pen — a multi-length set for striping, outlining, and long continuous strokes across short or long nails.
- The Ultimate Productivity Blueprint | Digital Productivity Guide for Goal Setting, Time Management & Daily Routines — helpful for organizing practice sessions, timing cures/dry times, and building a consistent nail-art routine.
FAQ
Which liner brush length is easiest for beginners?
Most beginners do best with 6–12 mm because shorter bristles wobble less and feel easier to steer around cuticles and tight corners. Once line pressure is consistent, moving up to 15 mm usually makes longer stripes smoother with fewer reloads.
Can liner brushes be used with gel polish and gel paint?
Yes—gel’s longer working time makes it easier to perfect thin lines before curing. Keep your brush away from UV/LED exposure while working, cure after detail layers for crisp edges, and clean with an appropriate cleanser to prevent gel buildup.
How do you stop striping lines from bleeding or spreading?
Start with a fully cured/dry base, load minimal product, and use very light pressure so the line stays narrow. Make sure your product isn’t over-thinned, and seal with a floating top coat to avoid flooding the sidewalls and softening the linework.


Leave a comment