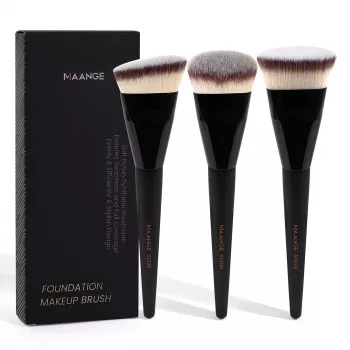
3 Essential Face Brushes for Foundation, Concealer & Blush
3-Piece Makeup Brush Set for Smooth Foundation, Precise Concealer, and Natural Blush
A simple, reliable brush trio can make everyday makeup faster and more even-looking. This 3-piece set focuses on the core face steps—base, spot coverage, and cheek color—so product lays down smoothly, blends cleanly, and stays natural in different lighting. When the tools are straightforward, it’s easier to keep coverage where you want it, soften edges where you don’t, and avoid the “too much product” look that can happen when everything is applied with fingers alone. For more guidance, see Cosmetics and Constructions of Race in Rio de Janeiro.
What This 3-Piece Set Is Designed to Do
This set is built around the three moves that make the biggest difference in complexion makeup: laying down an even base, correcting small areas without disturbing the rest of the face, and adding controlled color that doesn’t look patchy or harsh. For further reading, see 4 Best Makeup Brushes of 2026, Tested by Experts.
- Streamline a complete face routine with three core brushes: base coverage, targeted concealing, and cheek color.
- Support a soft, blended finish with fewer streaks and less patchiness than applying with fingers alone.
- Work with common textures: liquid foundation, cream concealer, and powder or cream blush (application technique matters).
- Keep the routine beginner-friendly while still useful for more polished looks.
Meet the Brushes: Roles and Best Uses
Each brush has a job. Using the right one at the right step helps prevent over-blending (which can remove coverage) and under-blending (which can leave visible edges).
- Foundation brush: best for spreading product evenly across larger areas like cheeks, forehead, and jawline; ideal for building coverage in thin layers.
- Concealer brush: best for pinpoint placement around the nose, under-eyes, and blemishes; helps press product into place without over-spreading.
- Blush brush: best for diffusing color on the cheeks; helps prevent harsh edges and keeps pigment placement controlled.
| Brush | Best for | Technique cue | Finish tip |
|---|---|---|---|
| Foundation | All-over base (liquid/cream) | Apply in thin layers, then blend outward | Avoid overloading; add product gradually |
| Concealer | Under-eye, redness, blemishes | Press and tap to keep coverage where placed | Set lightly to prevent creasing |
| Blush | Cheeks and cheekbones (powder/cream) | Start light, build, and blend edges | Place higher for lift, lower for a softer look |
A Simple 3-Step Face Routine Using the Set
This routine keeps product placement intentional. The goal is to build where needed and keep everything else thin so skin still looks like skin.
- Step 1 — Base: apply a small amount of foundation to the center of the face and blend outward for the most natural coverage distribution.
- Step 2 — Detail coverage: add concealer only where needed (inner corner, under-eye shadow, around nostrils, blemishes) and tap to blend without removing product.
- Step 3 — Color: place blush where the face naturally flushes; blend back toward the hairline for a seamless transition.
- Optional finishing: lightly set areas that crease or get oily; keep the cheek area softer if a dewy look is preferred.
Application Tips for Different Formulas
The same brush can perform differently depending on texture. Small technique shifts help product sit better on top of skincare and wear more evenly throughout the day.
- Liquid foundation: use light pressure and build in thin layers; too much product at once can emphasize texture.
- Cream products: press and stipple rather than sweeping to avoid lifting skincare or sunscreen underneath.
- Powders: tap off excess before applying; place color first, then blend edges so pigment stays where intended.
- Under-eye concealer: blend in short taps; keep product concentrated on the darkest area instead of covering the entire under-eye.
Choosing the Right Coverage and Placement (Quick Checks)
Small checks during application can make your makeup look more balanced and natural in mirrors, selfies, and daylight.
- Match coverage to the moment: sheer layers read more skin-like in daylight; extra layers can be added only where needed.
- Check symmetry: apply blush on one side, then mirror placement on the other before blending fully.
- Avoid muddy color: keep foundation and blush layers thin; too many thick layers can dull brightness.
- Blend transitions: blend down the jawline and slightly onto the neck when needed for a seamless shift.
Cleaning and Care for Better Results and Longer Brush Life
Clean brushes don’t just feel nicer—they also help makeup apply more evenly. Product buildup can cause streaking, uneven blending, and a heavier finish than you intended.
Who This Set Suits Best
Product Details and Where to Get It
If you’re ready to simplify your everyday face routine with three purpose-built tools, the set is available here: 3PCS Professional Makeup Brush Set for Foundation, Concealer & Blush. It includes three face brushes designed for the foundation, concealer, and blush steps, and performs best with thin, buildable layers and gentle tapping motions for the most seamless blend. For the latest price and availability, check the product page.
More from the shop
- The Ultimate Productivity Blueprint | Digital Productivity Guide for Goal Setting, Time Management & Daily Routines
- Stronger Together: Family Bonding Pack | Digital Family Activities Guide for Kids & Parents
FAQ
Can these brushes be used with both cream and powder products?
Yes—use pressing/tapping motions for creams and light sweeping/blending for powders. For powders, tap off excess first so color stays controlled and doesn’t skip or fall out.
How often should makeup brushes be cleaned?
Spot-clean as needed and deep-clean regularly, especially for brushes used with liquid or cream products. Powder-only brushes can often go a bit longer, but consistent cleaning helps keep blending smooth.
What helps prevent streaks when applying foundation with a brush?
Use less product and build in thin layers, then finish with gentle tapping/stippling to soften any brush lines. Keeping the brush from getting overloaded usually makes the biggest difference.


Leave a comment