30-Bin Wall Parts Organizer + Rack: Fast, Visible Storage
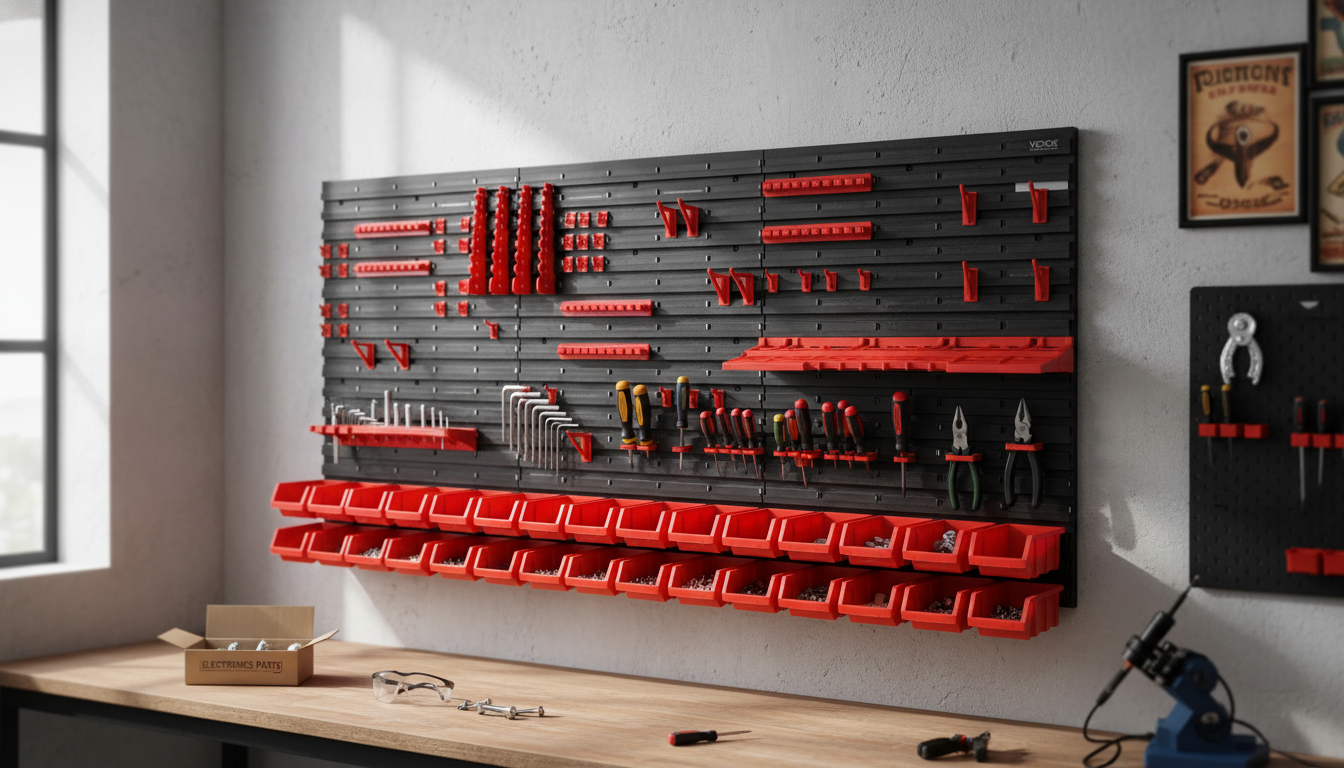
30-Bin Wall Mounted Parts Organizer with Storage Rack & Panels
A wall-mounted bin system keeps small parts visible, sorted, and easy to grab—without sacrificing bench space. This organizer pairs a 30-bin layout with rack-and-panel storage so fasteners, craft supplies, and hardware stay grouped by task and easy to restock. Instead of digging through mixed drawers or half-open boxes, each item gets a clear “home,” which helps projects move faster and cleanup happen automatically.
What This Organizer Helps With
- Reduces time spent searching for screws, anchors, fittings, connectors, and small tools
- Turns unused wall space into high-density storage for garages, workshops, sheds, and utility rooms
- Keeps frequently used parts within reach while protecting surfaces from clutter
- Supports label-based organizing for repeatable workflows (projects, sizes, or categories)
When small parts are sorted and visible, it’s easier to keep “like with like.” That means fewer accidental mix-ups (wrong screw length, mismatched terminals) and fewer last-minute trips for items you already own but can’t locate.
Key Components and Layout
- Thirty individual bins for sorting by size, type, or project
- Wall-mounted panels that create a stable base and allow a tidy grid layout
- Storage rack area for overflow items, refills, or items that don’t fit in bins
- Open-front bin access so contents can be seen at a glance and grabbed quickly
The open-front design is especially useful during repetitive tasks—assembling furniture, building jigs, wiring accessories—because you can pick parts with one hand while the other hand holds a tool or component. The rack area adds a practical “backstock zone” so bins can stay dedicated to working quantities rather than becoming overfilled catch-alls.
Quick Spec and Fit Check
- Best for small, lightweight-to-moderate parts stored in separated compartments
- Ideal placement: above a workbench, along a tool wall, or near a repair station
- Plan a dedicated “refill zone” on the rack for bulk fasteners or backstock
- Consider labeling strategy before mounting (by size, material, or project type)
Organization ideas by use case
| Use case | How to arrange bins | What to keep on the rack |
|---|---|---|
| Home repairs | Sort by fastener type (screws, anchors, nails, washers) | Spackle, tape, extra anchors, small measuring tools |
| DIY/woodworking | Sort by length/gauge and specialty hardware | Glue, sandpaper packs, dowels, corner braces |
| Automotive | Sort by clips, fuses, terminals, hose clamps | Electrical tape, zip ties, spare bulbs |
| Crafts/hobbies | Sort by beads, findings, blades, nozzles | Refill packs, cutting mats, adhesives |
Where It Works Best
- Garages and workshops: fastener and hardware stations near the bench
- Laundry/utility rooms: wall space for clips, fittings, and small household parts
- Basements and storage rooms: categorized bins for seasonal or backup items
- Makerspaces: shared systems benefit from clear labeling and consistent placement
For shared areas, a consistent bin map (for example: “Electrical” on the top row, “Hardware” in the middle, “Consumables” on the bottom) reduces confusion and makes it easier for anyone to put items back where they belong.
Installation Planning and Wall Safety
- Mount to solid framing or use appropriate anchors for the wall type
- Keep the organizer at shoulder-to-eye level for visibility and safer access
- Leave clearance below for a bench surface or tool cart movement
- Distribute heavier items across multiple bins rather than loading one area
For general workshop safety and tidy tool areas, follow trusted guidance like OSHA’s hand and power tool safety resources and the CPSC’s garage safety tips. A clean, predictable workspace reduces slips, dropped items, and rushed mistakes.
Practical Setup Tips for Long-Term Order
- Assign bins by frequency: daily-use items in the center, occasional items on outer edges
- Use consistent labels (size + type) and place refill quantities on the rack
- Keep a “miscellaneous” bin small and temporary—review it monthly
- Standardize container rules: one part family per bin to prevent mix-ups
A simple labeling system can be as straightforward as “#8 x 1-1/4 wood screws” or “Blue butt connectors (16–14 AWG).” If labels are consistent, it’s easier to delegate restocking and to spot what’s missing at a glance.
Care, Cleaning, and Reorganizing
- Empty and wipe bins periodically to remove dust and metal shavings
- Check mounting points occasionally, especially in high-use areas
- Rebalance categories when a bin routinely overflows—split by size or finish
- Keep a simple restock routine: refill from rack storage when a bin hits a low mark
When a category outgrows a single bin, avoid the temptation to mix sizes “just for now.” Splitting by length, head type, or finish keeps selection fast and reduces the odds of grabbing the wrong part mid-project.
Product Options Available
- 30-Bin Wall Mounted Parts Organizer with Storage Rack & Panels ($43.51): a compact wall solution for sorting small parts with an added rack area for refills and larger accessories.
- The Ultimate Productivity Blueprint | Digital Productivity Guide for Goal Setting, Time Management & Daily Routines ($14.99): helpful for setting simple routines—like weekly restocking and monthly bin audits—so the organizer stays useful over time.
FAQ
What should go in the bins versus on the rack?
Use bins for small, frequently accessed parts that benefit from separation, such as screws, anchors, terminals, and clips. Use the rack for refills, bulk packs, and items that don’t fit well in small compartments so you can restock without overflowing the bins.
Can it be mounted on drywall?
Mounting is simplest into studs for strength and long-term stability. If studs aren’t available, use anchors rated for the combined load, follow the anchor instructions closely, and distribute heavier items across multiple bins rather than concentrating weight in one spot.
How can small parts be kept from getting mixed together?
Label each bin clearly and keep one category per bin to prevent cross-contamination. For very small items, use small sub-bags inside a bin or split by size so parts don’t spill together during quick grabs.


Leave a comment